GCM is a free service that helps developers send data from servers to their Android applications on Android devices, and upstream messages from the user's device back to the cloud.


/extras/google/google_play_servies/libproject
<uses-permission android:name="android.permission.WAKE_LOCK" />
<uses-permission android:name=“.permission.RECEIVE" />
android:name="
private static int getAppVersion(Context context)
1. Create/Register App on Google Cloud
2. Setup Cloud SDK with Development
3. Configure project for GCM
4. Get Device Registration ID
5. Send Push Notifications
6. Receive Push Notifications
7. Handle Further step as per Notification type.

1. Create and Register Application on Google Cloud
Go to the Google Cloud Console - https://cloud.google.com/console
Login with your gmail account

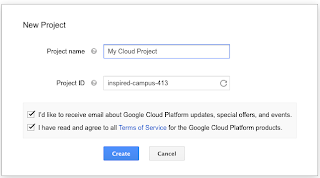
# Create New Project
Create New Project

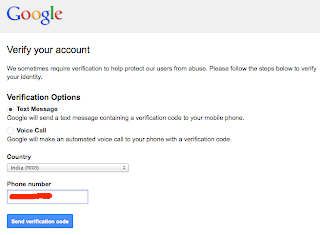
Complet the Mobile number verification for security

# Get SENDER_ID
Once you create Project, you will get landed on google cloud’s dash board
Here you can see SENDER_ID
Note : please note down SENDER_ID it is important to get RegID from GCM

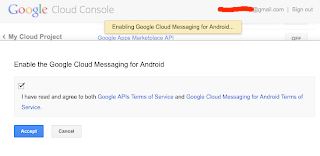
# Enable Google cloud messaging service
From Dashboard go to —> APIs & auth
Switch ON - Google Cloud Messaging for Android option


# Get API key
select API & auth —> Registered apps
click Register App button
Give the details this way
If you are Sending Push Notification From your Local Web Server
Name - MyCloud App
Platform - [ Android : Accessing APIs via a web server ]
Click Register.

If you are Sending Push Notification From your Android App itself
Name - MyCloud App
Platform - [ Android : Accessing APIs directly from Android ]
Package Name -
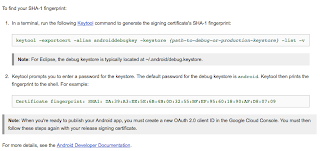
SHA1 fingerprint -
Check here How to Generate SHA key for your app
Hint : Just search for the string “To find your SHA-1 fingerprint:" and follow the instructions

Click Register.
Once it get registered —> click on Server Key —> copy API key
Note : please note down API_KEY , it is important for sending PN Message to GCM

Done!!
2. Setup Cloud SDK with Development
Google Cloud Messaging require Google Play Service SDK installed in our Development
# Install Google Play Service SDK
Go to Android SDK manager —> Extras
Install Google Play Service SDK
Install Google Play Service for Froyo SDK (If your app supports android 2.2)
# Update Android Support Library
Go to Android SDK manager —> Extras
Install or Update Android Support Library

# Import Google Play Service SDK into our Project
Go to path where Android SDK is installed in your system
copy the library project named “google-play-services_lib” from location
and paste where you maintain your lib projects
Now come to project —> Import —>Android —> Existing Android code in Workspace
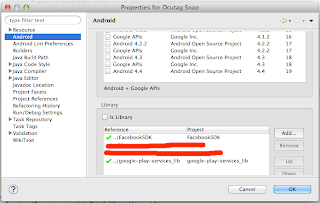
# Add Google Play Service Lib to build path
Right click on project —> Build Path —> Configure Build Path
Click on Android —> Is Library —> Add —>Apply.

Done!!
3. Configure project for GCM
# Update AndroidManifest file
For enable GCM in our project we need to add few permission in our manifest file
Go to AndroidManifest.xml and add below code
# Add Permission
<uses-permission android:name="android.permission.INTERNET”/>
<uses-permission android:name="android.permission.GET_ACCOUNTS" /><uses-permission android:name="android.permission.WAKE_LOCK" />
<uses-permission android:name="android.permission.VIBRATE" />
<uses-permission android:name=“<your_package_name_here>.permission.C2D_MESSAGE" />
<permission android:name=“<your_package_name_here>.permission.C2D_MESSAGE"
android:protectionLevel="signature" />
# Add GCM Broadcast Receiver declaration
add GCM Broadcast Receiver declaration in your application tag
<application
<receiverandroid:name="
android:permission="com.google.android.c2dm.permission.SEND" ]]>
<intent-filter]]>
<action android:name="com.google.android.c2dm.intent.RECEIVE" />
<category android:name="
<intent-filter]]>
<action android:name="com.google.android.c2dm.intent.RECEIVE" />
<category android:name="
</intent-filter]]>
private final static int PLAY_SERVICES_RESOLUTION_REQUEST = 9000;public static final String EXTRA_MESSAGE = "message";public static final String PROPERTY_REG_ID = "registration_id";private static final String PROPERTY_APP_VERSION = "appVersion";private final static String TAG = "LaunchActivity";
protected String SENDER_ID = "your_sender_id";private GoogleCloudMessaging gcm =null;private String regid = null;
@Override
protected void onCreate(Bundle savedInstanceState)
{
gcm = GoogleCloudMessaging.getInstance(this);
regid = getRegistrationId(context);
if (regid.isEmpty())
{
registerInBackground();
}
else
{
Log.d(TAG, "No valid Google Play Services APK found.");
}
}
@Override protected void onResume()
{
super.onResume(); checkPlayServices();
private boolean checkPlayServices() {
int resultCode = GooglePlayServicesUtil.isGooglePlayServicesAvailable(this);
if (resultCode != ConnectionResult.SUCCESS) {
if (GooglePlayServicesUtil.isUserRecoverableError(resultCode)) {
GooglePlayServicesUtil.getErrorDialog(resultCode, this,
PLAY_SERVICES_RESOLUTION_REQUEST).show();
} else {
Log.d(TAG, "This device is not supported - Google Play Services.");
finish();
}
return false;
}
return true;
private String getRegistrationId(Context context)
</receiver]]>
<application/>
# Add GCM Servie declaration
<application
<service android:name="
<application/>
# Update Proguard Config File
If you are using Proguard in your application then you must configure
Go to proguard- project.txt File and add below code
———————————————————————
-keep class * extends java.util.ListResourceBundle {
    protected Object[][] getContents();
}

-keep public class com.google.android.gms.common.internal.safeparcel.SafeParcelable {
    public static final *** NULL;
}

-keepnames @com.google.android.gms.common.annotation.KeepName class *
-keepclassmembernames class * {
    @ccom.google.android.gms.common.annotation.KeepName *;
}

-keepnames class * implements android.os.Parcelable {
    public static final ** CREATOR;
}
———————————————————————
4. Get Device Registration ID
Now When device launch the app we need to Get the Registration ID to Send Message
So Go to your Launch/Splash Activity
#Add Constants and Class Variables
protected String SENDER_ID = "your_sender_id";private GoogleCloudMessaging gcm =null;private String regid = null;
private Context context= null;
# Update OnCreate and OnResume methods
protected void onCreate(Bundle savedInstanceState)
{
super.onCreate(savedInstanceState);
setContentView(R.layout.activity_launch);
context = getApplicationContext();
if (checkPlayServices())
{gcm = GoogleCloudMessaging.getInstance(this);
regid = getRegistrationId(context);
if (regid.isEmpty())
{
registerInBackground();
}
else
{
Log.d(TAG, "No valid Google Play Services APK found.");
}
}
}
{
super.onResume(); checkPlayServices();
}
# Implement GCM Required methods (Add below methods in LaunchActivity)
int resultCode = GooglePlayServicesUtil.isGooglePlayServicesAvailable(this);
if (resultCode != ConnectionResult.SUCCESS) {
if (GooglePlayServicesUtil.isUserRecoverableError(resultCode)) {
GooglePlayServicesUtil.getErrorDialog(resultCode, this,
PLAY_SERVICES_RESOLUTION_REQUEST).show();
} else {
Log.d(TAG, "This device is not supported - Google Play Services.");
finish();
}
return false;
}
return true;
}
{
final SharedPreferences prefs = getGCMPreferences(context);
String registrationId = prefs.getString(PROPERTY_REG_ID, "");
if (registrationId.isEmpty()) {
Log.d(TAG, "Registration ID not found.");
return "";
}
int registeredVersion = prefs.getInt(PROPERTY_APP_VERSION, Integer.MIN_VALUE);
int currentVersion = getAppVersion(context);
if (registeredVersion != currentVersion) {
Log.d(TAG, "App version changed.");
return "";
}
return registrationId;
private SharedPreferences getGCMPreferences(Context context)
final SharedPreferences prefs = getGCMPreferences(context);
String registrationId = prefs.getString(PROPERTY_REG_ID, "");
if (registrationId.isEmpty()) {
Log.d(TAG, "Registration ID not found.");
return "";
}
int registeredVersion = prefs.getInt(PROPERTY_APP_VERSION, Integer.MIN_VALUE);
int currentVersion = getAppVersion(context);
if (registeredVersion != currentVersion) {
Log.d(TAG, "App version changed.");
return "";
}
return registrationId;
}
{
return getSharedPreferences(LaunchActivity.class.getSimpleName(),
Context.MODE_PRIVATE);
return getSharedPreferences(LaunchActivity.class.getSimpleName(),
Context.MODE_PRIVATE);
}
{
try
try
{
PackageInfo packageInfo = context.getPackageManager()
.getPackageInfo(context.getPackageName(), 0);
return packageInfo.versionCode;
}
PackageInfo packageInfo = context.getPackageManager()
.getPackageInfo(context.getPackageName(), 0);
return packageInfo.versionCode;
}
catch (NameNotFoundException e)
{
throw new RuntimeException("Could not get package name: " + e);
}
private void registerInBackground()
throw new RuntimeException("Could not get package name: " + e);
}
}
{ new AsyncTask() {
Override
protected Object doInBackground(Object... params)
Override
protected Object doInBackground(Object... params)
{
String msg = "";
try
String msg = "";
try
{
if (gcm == null)
if (gcm == null)
{
gcm = GoogleCloudMessaging.getInstance(context);
}
regid = gcm.register(SENDER_ID); Log.d(TAG, "########################################");
Log.d(TAG, "Current Device's Registration ID is: "+msg);
}
gcm = GoogleCloudMessaging.getInstance(context);
}
regid = gcm.register(SENDER_ID); Log.d(TAG, "########################################");
Log.d(TAG, "Current Device's Registration ID is: "+msg);
}
catch (IOException ex)
{
msg = "Error :" + ex.getMessage();
}
msg = "Error :" + ex.getMessage();
}
return null;
} protected void onPostExecute(Object result)
} protected void onPostExecute(Object result)
{ //to do here };
}.execute(null, null, null);
}
public class GcmBroadcastReceiver extends WakefulBroadcastReceiver {
@Override
public void onReceive(Context context, Intent intent)
Note : please store REGISTRATION_KEY, it is important for sending PN Message to GCM
also keep in mine this will be unique for all device, by using this only GCM will send Push Notification.
5. Send Push Notifications
# If you are sending message from your local web server
While launching/login app you need to send REGISTRATION_ID to your web server.
Actually Web server needs below three variable to send Message to GCM
REGISTRATION ID
API Key
Message Text
# If you are sending message from your Android app itself
here you need to add below code in your activity to send Message
public void onClick(final View view)
{
new AsyncTask() { @Override
protected String doInBackground(Void... params)
new AsyncTask() { @Override
protected String doInBackground(Void... params)
{
String msg = ""; try {
Bundle data = new Bundle();
data.putString("my_message", "Hello World");
data.putString("my_action",
"com.google.android.gcm.demo.app.ECHO_NOW");
String id = Integer.toString(msgId.incrementAndGet()); gcm.send(SENDER_ID + "@gcm.googleapis.com", id, data);
msg = "Sent message";
} catch (IOException ex) {
msg = "Error :" + ex.getMessage();
}
return msg;
} @Override
protected void onPostExecute(String msg) {
mDisplay.append(msg + "\n");
}
}.execute(null, null, null);
}
6. Receive Push Notifications
#Add GCM Broadcast Receiver Class
As we have already declared “GcmBroadcastReceiver.java” in our Manifest file, So lets create this class
update receiver class code this way
@Override
public void onReceive(Context context, Intent intent)
{ ComponentName comp = new ComponentName(context.getPackageName(),
GcmIntentService.class.getName()); startWakefulService(context, (intent.setComponent(comp)));
setResultCode(Activity.RESULT_OK);
Toast.makeText(context, “wow!! received new push notification", Toast.LENGTH_LONG).show();
}
public class GcmIntentService extends IntentService
{ public static final int NOTIFICATION_ID = 1; private NotificationManager mNotificationManager; private final static String TAG = "GcmIntentService"; public GcmIntentService() {
super("GcmIntentService");
GcmIntentService.class.getName()); startWakefulService(context, (intent.setComponent(comp)));
setResultCode(Activity.RESULT_OK);
Toast.makeText(context, “wow!! received new push notification", Toast.LENGTH_LONG).show();
}
}
#Add GCM Service Class
As we have already declared “GcmBroadcastReceiver.java” in our Manifest file, So lets create this class
update receiver class code this way
{ public static final int NOTIFICATION_ID = 1; private NotificationManager mNotificationManager; private final static String TAG = "GcmIntentService"; public GcmIntentService() {
super("GcmIntentService");
} @Override
protected void onHandleIntent(Intent intent) {
Bundle extras = intent.getExtras();
Log.d(TAG, "Notification Data Json :" + extras.getString("message"));
GoogleCloudMessaging gcm = GoogleCloudMessaging.getInstance(this);
String messageType = gcm.getMessageType(intent); if (!extras.isEmpty()) { if (GoogleCloudMessaging.MESSAGE_TYPE_SEND_ERROR
.equals(messageType)) {
sendNotification("Send error: " + extras.toString());
} else if (GoogleCloudMessaging.MESSAGE_TYPE_DELETED
.equals(messageType)) {
sendNotification("Deleted messages on server: "
+ extras.toString()); // If it's a regular GCM message, do some work.
} else if (GoogleCloudMessaging.MESSAGE_TYPE_MESSAGE
.equals(messageType)) {
// This loop represents the service doing some work.
for (int i = 0; i < 5; i++) {
Log.d(TAG," Working... " + (i + 1) + "/5 @ "
for (int i = 0; i < 5; i++) {
Log.d(TAG," Working... " + (i + 1) + "/5 @ "
+ SystemClock.elapsedRealtime()); try {
Thread.sleep(5000);
} catch (InterruptedException e) {
}
}
Log.i(TAG, "Completed work @ " + SystemClock.elapsedRealtime());
sendNotification(extras.getString("message"));
}
} // Release the wake lock provided by the WakefulBroadcastReceiver.
GcmBroadcastReceiver.completeWakefulIntent(intent);
} // Put the message into a notification and post it.
// This is just one simple example of what you might choose to do with
// a GCM message.
private void sendNotification(String msg) { mNotificationManager = (NotificationManager) this
.getSystemService(Context.NOTIFICATION_SERVICE);
PendingIntent contentIntent = PendingIntent.getActivity(this, 0, new Intent(this, LaunchActivity.class), 0);
NotificationCompat.Builder mBuilder = new NotificationCompat.Builder( this)
.setSmallIcon(R.drawable.icon)
.setContentTitle("Ocutag Snap")
.setStyle(new NotificationCompat.BigTextStyle().bigText(msg))
.setContentText(msg)
.setDefaults(Notification.DEFAULT_SOUND | Notification.DEFAULT_VIBRATE);
mBuilder.setContentIntent(contentIntent); mNotificationManager.notify(NOTIFICATION_ID, mBuilder.build());
}
}
That’s It We have Done!! no more coding. Just Build the App
If you sending Message from your own Web server tell them to send Message
or else you can send message from your own device.
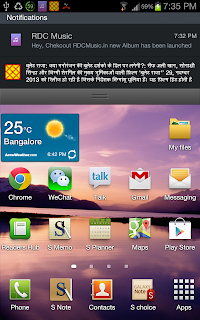
Run the app. And you should Receive the Push Notification on Your Device with Sound + Vibration alert.
Cheers!! We Did It.
For more info please! Check below references :
Google Documentation
Google Open Source Code


